
#2 Emmert Pattern Makers' Vise Restoration
- Chuck Hess just another sponge in the sea of knowledge
- Nov 7, 2020
- 4 min read
Updated: Jan 25, 2025
11-6-2020 This is a #2 Emmert Pattern Makers' Vise with 5" x 14" jaws, and 1 set of bench dogs. We got this vise with a whole van load of Oliver parts from a dear friend of ours, Tom Reiley, in New Jersey.


You can't see this vise in the picture because Tom did such a fantastic job of boxing everything up! The vise in the photo is an Oliver Patternmakers vise, sorry for the gloat. The other pic has me in the middle (with pandemic beard), my son Makena on the right and our friends Tom's transporter, Joe on the left. This little #2 Emmert Vise was already disassembled so there is not a "before" picture. We have another one of these little ones and we love it, so we are very excited to have another one. It has heavy coats of paint and needs to be restored, so here we go cleaning parts;

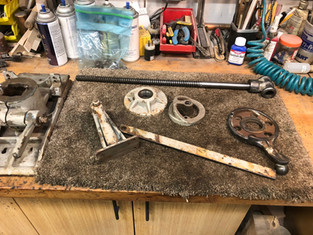


I don't know how to tell the age of these but these castings look older to me. The raised letters are a little weak and the main screw has buttress threads. On Oliver vises the buttress threads mean pre 1926, but I don't know if that applies to Emmerts. Cleaning parts is always sort of fun; it's during this process is where you find serial numbers or other markings that are hidden under those 12 coats of paint. Sometimes you also find old repairs like this one.


That is an old braze job that looks very good, I am just going to clean it up a little. So more cleaning and shellacking parts;


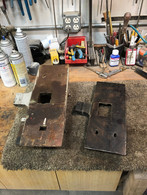
On this particular little beauty the hinge is frozen tight. No Bueno. I can see a small crack in the mounting plate too. The mounting plates are are often damaged on these old vises. I have had to replace a few of them in the past so I want to be careful. Instead of trying to loosen the hinge I am going to go ahead and remove the hinge pins. This is always a tad tedious. The way that I do it is to drill and tap into the hinge pin, add a cap screw and washer and then add spacers (usually nuts) under the washer so I can tighten the screw and it will elevate the pin. They are not easy to get out any other way. Once the first one is out I can usually punch the other side out with a long punch.


They came out without too much trouble. One of the pins is bent so I will replace both of them. I will also have a friend, Aubrey the welder, repair the plate. On small pieces he likes to use nickel rod, and he has crazy skills!


I'm going to clean that up a little and it will be great. I do these restorations to put things into service in our shop, so I am not trying to achieve museum quality but I always try to do very nice work. So the finish sequence that I am going to do is for step #1, shellac all the castings. Step #2 is to do all masking. My standard op is to not paint milled surfaces, nuts and bolts and things you touch with your hands like knobs and handwheels. All those remain with shellacked finish, which will stay nice a long time. Step #3 is to use a rattle can primer from Sherwin they call pro primer in the tall cans, its good stuff and saves a lot of time for small parts. Step #4 is final spray paint, in this case I'm using Sherwin industrial enamel, this can is from 2009 and looks like it has been through the war, with some hardener added. The vise is going to be black with white letters.


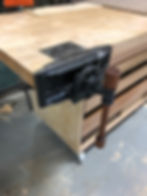
11-19-2020 Now that the restoration is done next is mounting this little beauty on a workbench. I am going to recess this in so when the vise is open the back jaw is just a little proud the the work bench front edge. This keeps the vise from protruding out so far from the bench. It will still snag your cords and hoses (like everything else), but not as much.


Sure seems to be a lot of tools out! This is a 2 1/4" thick top and with the little vise there is a lot of stock removal to do. I call that little ole saw "Mighty Mouse" It was just about the right diameter, if used sideways. I used a suicide stop clamped to the bench for this process. Kids do not try this at home...


It takes a minute to install one of these! Now all that's left to do is to get my son Makena to turn a new handle. He is giving Cameron a turning lesson and using Jatoba for the handle. We do use rubber o-rings on each end to cushion the handle a little. That's nice!


11-20-2020 Done!
Thanks for looking! Enjoy Your Projects!